How to Own Your Site Design With This Easy CSS Trick

Whether you're relatively new to rocking WordPress and Squarespace, or have been doing so for awhile, there's still so much to learn! Have you ever struggled to get rid of that one pesky element, but didn't feel like paying your developer friend or a stranger, and don't even want to go there with "child themes"? What are those anyway?
What if I told you there is a simple way to remove unwanted elements from your website without having to edit your theme files?
Showing and hiding content is kind of a big deal, so today I want to share with you my favorite CSS trick for doing so, the display: none rule. It's very handy when you need to quickly remove specific elements that you don't want on your website. This post will show you everything you need to know about using this wonderfully powerful line of CSS.
Getting Started
If you've been owning the inspect element tool like a boss, this will be familiar. For those of you that haven't used inspect element, I promise it won't hurt! We are going to use our Monstera theme for WordPress to show you an example. To get started, in the web page in your browser, right-click. You'll see Inspect at the bottom.

After clicking Inspect, you'll see the window open below the content.

With our Inspect window open, we can begin viewing our site's CSS code and even sample a few changes of our own.
A Basic Example
There are many ways for your readers to share your content in using the built-in share buttons, but perhaps you think email is old school and want to remove that option only. Below I'll show you how to remove the Email link only without removing the other share links.

We'll target the share email element with Inspect once again to figure out that we need to target the .email-share element.
.email-share { display: none; }
Add it into our Additional CSS box under Appearance > Customize, and voila! It's gone.

Two More Examples
Let's hide the dates after the title of your blog post. For this example, we'll use the Matchstick theme for WordPress. Below you can see the before look and that February 18 is the date after the title Terrariums For Rainy Days. With inspect element, I've isolated what element I'm targeting, which is p.entry-meta.

After targeting p.entry-meta to remove the date, I am going type display: none underneath white-space: no-wrap. Here's where the magic happens!

Hooray, it looks great! Now, if you're using the Kindred theme for your delicious recipe blog and the featured image is preventing you from immediately getting to the content so you want to remove it, below we show how to do so with our new CSS trick!

We've found our selector, .attachment-blog-featured, so our snippet becomes:
.attachment-blog-featured { display: none; }

Saving your Changes
Now what? If you wanted to save this to make the change permanent, you would do so by pasting the snippet into your WordPress dashboard under Appearance > Customize > Additional CSS.

Here's the snippet:
p.entry-meta {
display
:
none
; }
Be sure that you don't forget the closing bracket!
Squarespace Example
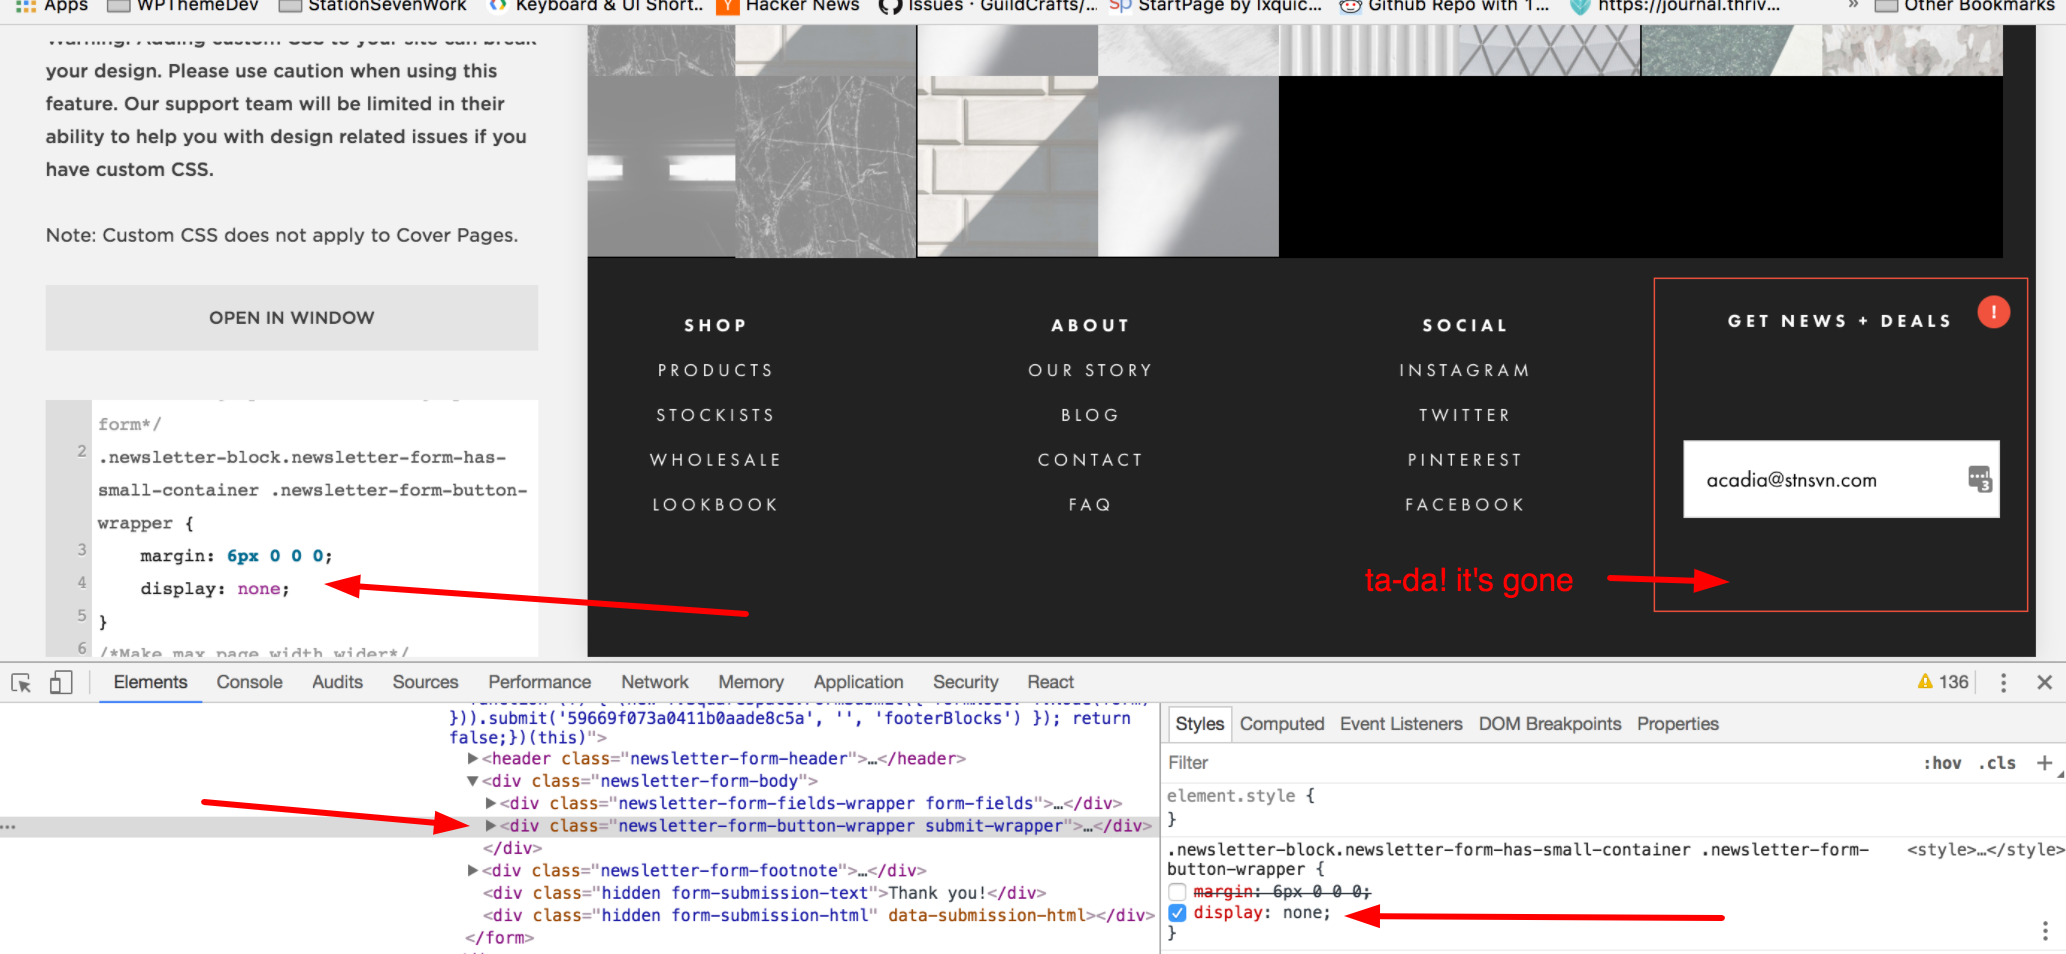
Let's now try using display none in a SquareSpace example this time, using the Fable Squarespace Template. In this example, we will be removing the button from the footer signup form.

From your SquareSpace dashboard, select Design, then scroll to the bottom and select Custom CSS.

After using inspect element, we'll find the piece we're removing and use this snippet to remove the button:
.newsletter-block .newsletter-form-button-wrapper button {
display
:
none
; }
Pro Tip: Title your Changes
Are you ready for another cool trick that I love? You can make a comment above your CSS snippet so that you can remember what it does! This is so helpful when you DIY and can't remember every pesky little detail.

I did this by typing /*Remove email signup button from footer*/ but it's not mandatory. However, it's a great way to keep yourself organized when adding your own customizations. Don't forget that the opening of commented out code always starts with a backslash and asterisk /* and ends with an asterisk and backslash */ and that anything in between (your handy notes) will not be displayed anywhere else.
And here's our end result!
AFTER
Final Notes
If you choose to use display: none, keep in mind that the item may still be loading on your web page, even if it's not displaying. Besides title tags, there are other elements to think of, like a JPEG or animated GIF. If you have something like this that's bigger in size, there could be page loading issues. No one wants to be slowed down while they're taking in your awesome content, right?
Also, many themes include built-in options to hide/remove elements. Be sure to check the relevant theme documentation for your theme, as well as the Customizer (in WordPress) or Style Editor (in Squarespace) to see if there are existing options for removing unwanted elements. No need to reinvent the wheel!
Your Examples
Now that you've seen our examples, why not try to use it for some of your own content? Think back to those times where you've been frustrated and thought "Gosh darn it, it's almost perfect but I want to remove ____ fill in the blank." You can also grab our free, 4-page CSS cheat sheet below and make even more customizations to your site.
So how are you going to implement display: none in your own projects? I'd love to see your examples in the comments!