How to Move from WordPress to Squarespace: The Complete Guide
Having hesitations about making the change from WordPress to Squarespace? Follow your gut and go for it because we've got you covered with this step by step tutorial including how to import your content, transfer your domain, and setup redirects to keep all that precious SEO goodness you've worked so heard to establish.
Go ahead and grab a fresh cup of coffee, and then let's get started.
1. Setup Squarespace
Go to Squarespace.com and click "Get Started" to begin setting up your new Squarespace site. It's super simple to do - just follow the on screen prompts and you'll have a basic site in a few minutes flat.
While you can transfer your WordPress content, you can't transfer your design. No worries though, we've got you covered with our Squarespace Templates. They not only make your site dreamy but include video tutorials that show you the ins-and-outs of managing your own Squarespace website - it's like a theme and a mini course all in one!
2. Import WordPress Content
After you've setup and logged in to your new Squarespace site, you can start transferring your content. From your Home menu go to Settings > Advanced > Import / Export > Import > WordPress.
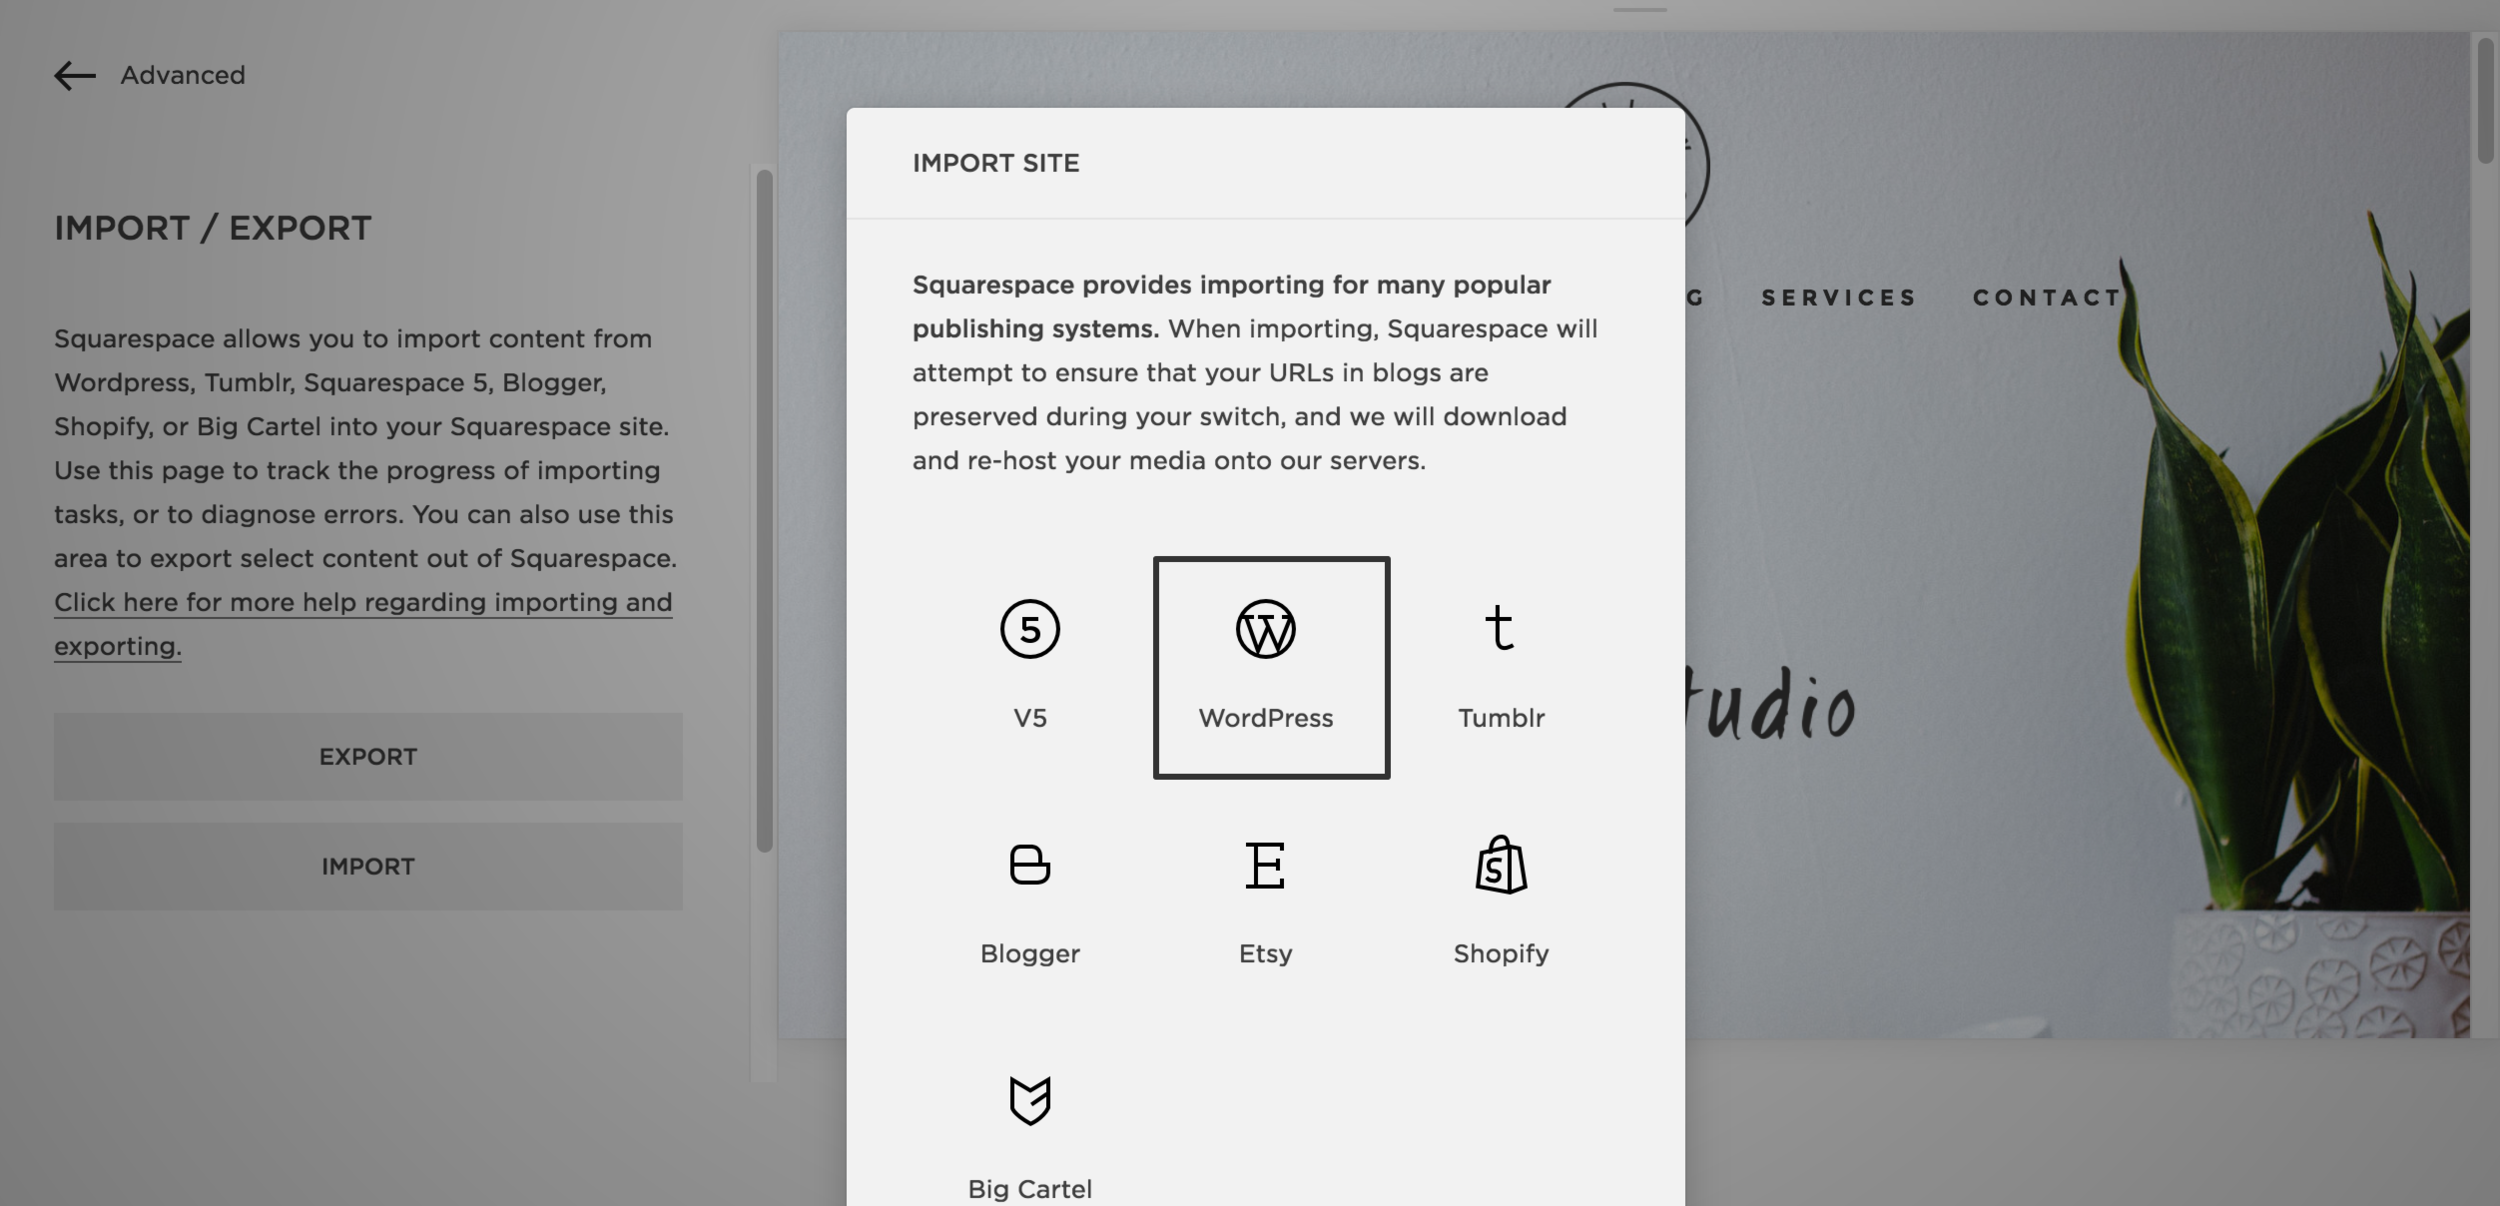
In the window that pops up, you'll be presented with the basic WordPress importer that will ask for your WordPress login credentials. If your WordPress site doesn’t have a lot of content you can try importing your content here with the basic importer, however we suggest using the advanced importer - in our experience it provides a more reliable import process. Click on the Advanced tab to access the advanced WordPress importer.
In another window, open your WordPress site and from the dashboard go to Tools > Export. Under the export options, click Export. Select the content you want to export and click Download Export File to export the .xml file to your computer.

On Squarespace, in your Advanced tab drag your .xml file into the XML Export Upload box and click Begin Import. A progress bar will open and a success message will appear once complete.

3. Enable Imported Pages
Now that you've imported your content, you'll need to enable your imported pages. Navigate back to Home Menu > Pages to manage your pages.
You'll see your freshly imported pages under the Not Linked section in your menu. To enable them, hover over the page and click the gear icon then Enabled > Save. You can now drag these pages to your navigation menu and arrange them however you like.
4. Transfer Your Custom Domain to Squarespace
If you want to use the domain currently used on your WordPress site, you will need to access your host so you can map the domain to your Squarespace site. Go to Settings > Domains > Connect a Third-Party Domain. Enter your domain name, find your host provider and click Connect Domain. A new panel will open with records you need to enter in your host’s account - keep this panel open, you'll need these records for the next step.

You will need to add these records to your host’s DNS settings. Squarespace has tutorials for individual hosting providers like Bluehost, HostGator, Namecheap and more. From there, your domain should start redirecting within 24 hours. You can check its status in Settings > Domain. A red line indicates it hasn’t gone through, a yellow line if it’s almost finished, and a green line when it’s done.
5. Configure Content Redirects
Now you will want to make sure any of your old links redirect to your new site - this is important for so many reasons:
You likely have lots of existing content online such as Pinterest pins, social media posts, and backlinks from other websites. It's important that people can still find the content by clicking on those existing links.
Just like human people, search engines have indexed your content at the existing urls. A redirect lets a search engine know that the content has moved, and where to find it.
All of this also allows you to keep all that sweet sweet SEO link juice you've worked hard to build - don't let it go to waste!
We'll be creating what are called 301 redirects - these are permanent redirects, meaning the content has moved for good. You could also create temporary redirects called 302 redirects, but 301 redirects are better for this situation.
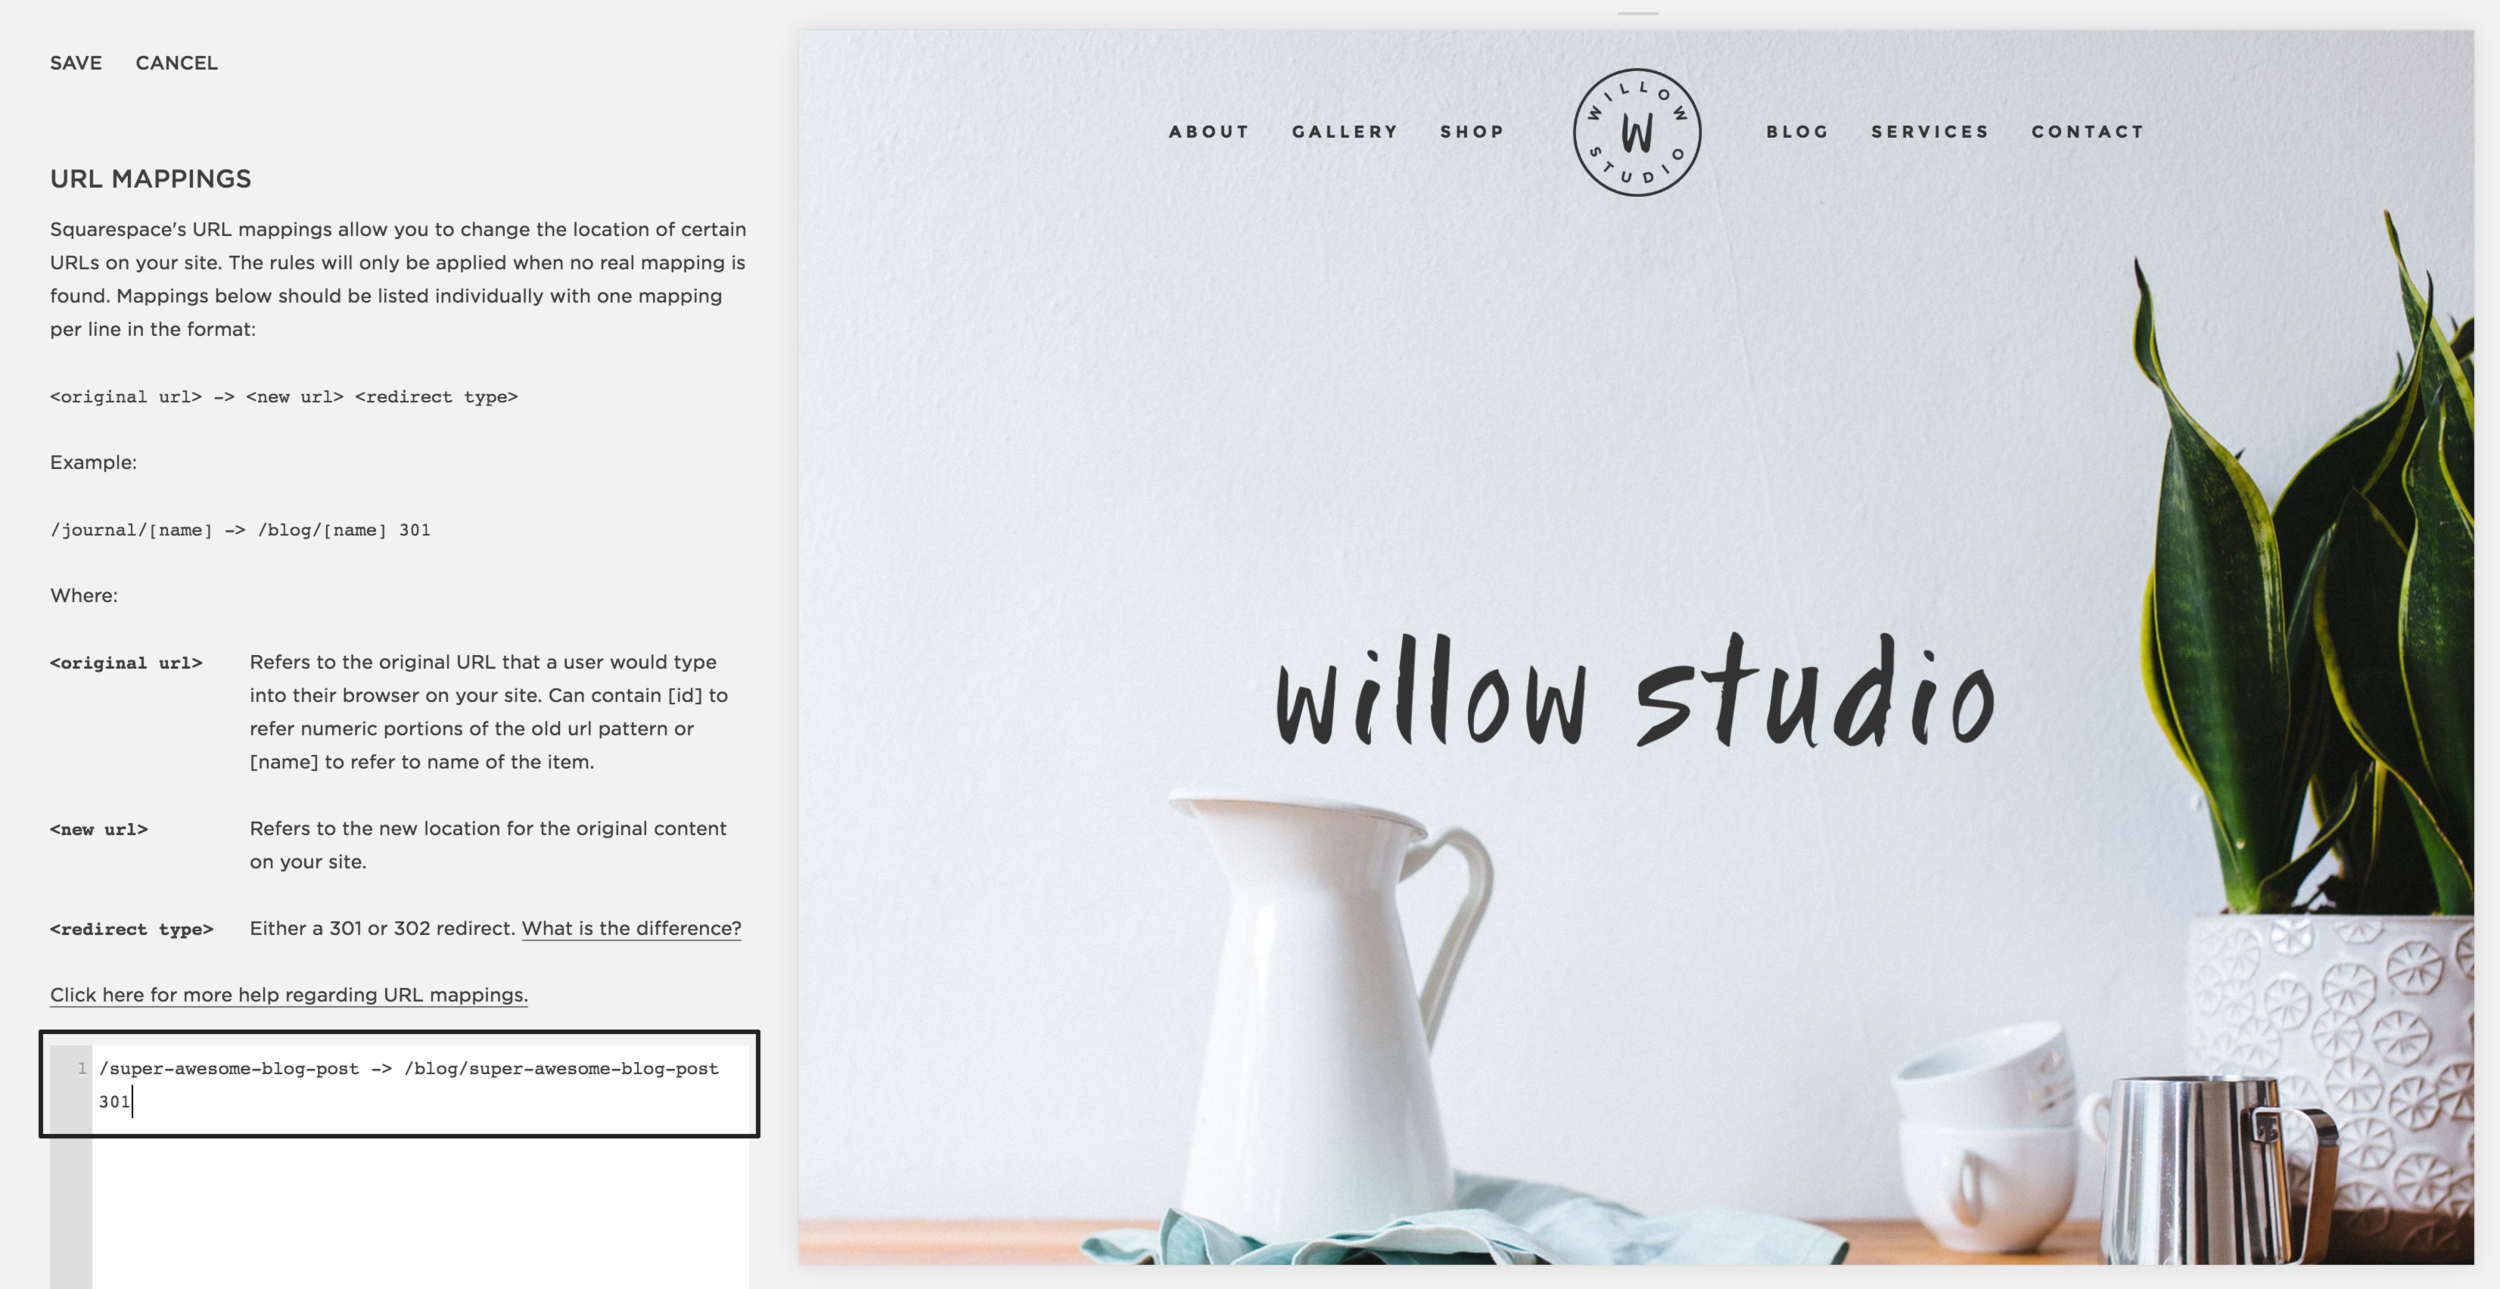
In Squarespace, go to Settings > Advanced > URL Mappings to enter in your URL mappings. URL mapping looks like this:
/old-url -> /new-url 301
There are four parts to URL mapping:
the old URL is the page that no longer exists
the arrow (->)
the new URL to the page you are redirecting too, and
the redirect type (301 or 302)
While your pages will likely have the same URL, Squarespace URLs for blog posts are different than WordPress'. Your old WordPress url might look like this:
http://your-domain.com/super-awesome-blog-post
The equivalent Squarespace URL will look like this:
http://your-domain.com/blog/super-awesome-blog-post
Since your domain name is the same, you only need to include the post name. The URL remapping for this post would then become:
/super-awesome-blog-post -> /blog/super-awesome-blog-post 301
If you don't redirect your posts, a visitor coming from Pinterest for example will land on your 404 error page instead of the content they are looking for - not good! Redirecting everything might be time consuming, so we recommend starting with your most popular posts, then working through the rest. Once you’re finished just click Save. You can find more info on URL mapping with Squarespace here.
Ready to get started?
If you're thinking of making the switch from WordPress to Squarespace, hopefully we've shown you that it's really nothing to get stressed about. The all-in-one platform they provide, combined with their powerful drag and drop interface offers an incredibly flexible and user-friendly option for bloggers and business owners.
Don't forget that while you can transfer your content from WordPress to Squarespace, you can’t transfer your design. If you’d like to find a new design, check out our Squarespace templates; they’ll give you that classic Station Seven look, optimized exclusively for Squarespace!
Don’t have the time and energy to make the switch yourself?
Hire us! We’ve recently added a new service of migrating WordPress sites to new Squarespace sites on a Station Seven template of your choice. Find out more on our Services page.
Are you thinking of making the switch from WordPress to Squarespace? Have you made the switch already? Share your experience in the comments below, and show off your new site!